Disclosure: we were financially compensated for this post. The opinions are completely our own based on our experience.
Does this sound familiar?
You’ve set yourself a publishing schedule for your blog. Just once a week, nothing crazy.
Heck, some of those bloggers you follow are publishing 3–4 times per week. You should be able to manage a single post every seven days, right? Should be easy.
Except all of a sudden… it isn’t.
The first post goes up and it’s amazing. You’re so proud.
Week two rolls around and it’s a bit of a struggle, but hey— nobody said this would be easy.
By week three the whole thing is starting to feel like a chore. You can’t remember all the good ideas you had during the week. You keep putting off the actual writing. And, before you know it you’re supposed to publish and the post is only half done.
Ever been there?
If so, don’t worry. That’s normal. Most content creators have felt overwhelmed before; especially at the beginning of their careers.
And that’s why today, we’re going to be talking about something important. Today’s article will show you how to write your blog posts more consistently with the help of a powerful team management tool, Monday.com (sign up here).
Monday is a life changing productivity tool that’s primarily used by startups, remote teams, freelancers, etc. It’s super versatile, and can be customized to suit just about any situation. However, in this article you’ll learn how to use Monday to craft a powerful editorial calendar that will actually motivate you to write.
For many of you, this may be the secret weapon that finally helps you fight back against procrastination and laziness— I know it was for me.
So, if you’re ready to become a more consistent blogger, ready to begin consistently hitting your deadlines, and eager to see writing as less of a chore… keep reading, and learn how to create a powerful editorial calendar for you blog.
FOLLOW ALONG
This guide uses team management software, Monday.
Sign up here, then keep reading and follow along.
Using the calendar
Here’s how this calendar works. You’ll create a big list of possible articles to work on and then move them through different stages of the calendar as you complete each one. Throughout the week, you’ll log in to Monday, work on the blog post a little, and then move it to the next stage.
The calendar works extremely well for a number of reasons.
First of all, you’ll be able to see, visually, everything you’re working on. This is great for killing feelings of overwhelm or when you feel as though you simply have too much to do. Instead, the calendar breaks your entire writing process into manageable, digestible steps.
The second reason you’ll love this calendar is that it almost feels like a game. As you work, you’ll be able to watch your articles come to life. And, as you complete each one, you’ll mark them with a very satisfying, very green, ‘Done’ label.
There’s something extremely comforting about watching your list of completed articles grow week after week.
Of course, in order to get started you’re going to need an idea for your first article. Which brings us to the first section in our calendar…
Article ideas
Step 1: Add Every Single Idea
You’ll notice that this editorial calendar is divided into four color-coded sections. Think of the first section, ARTICLE IDEAS, like an open bucket for any and all new content ideas that happen to cross your mind.
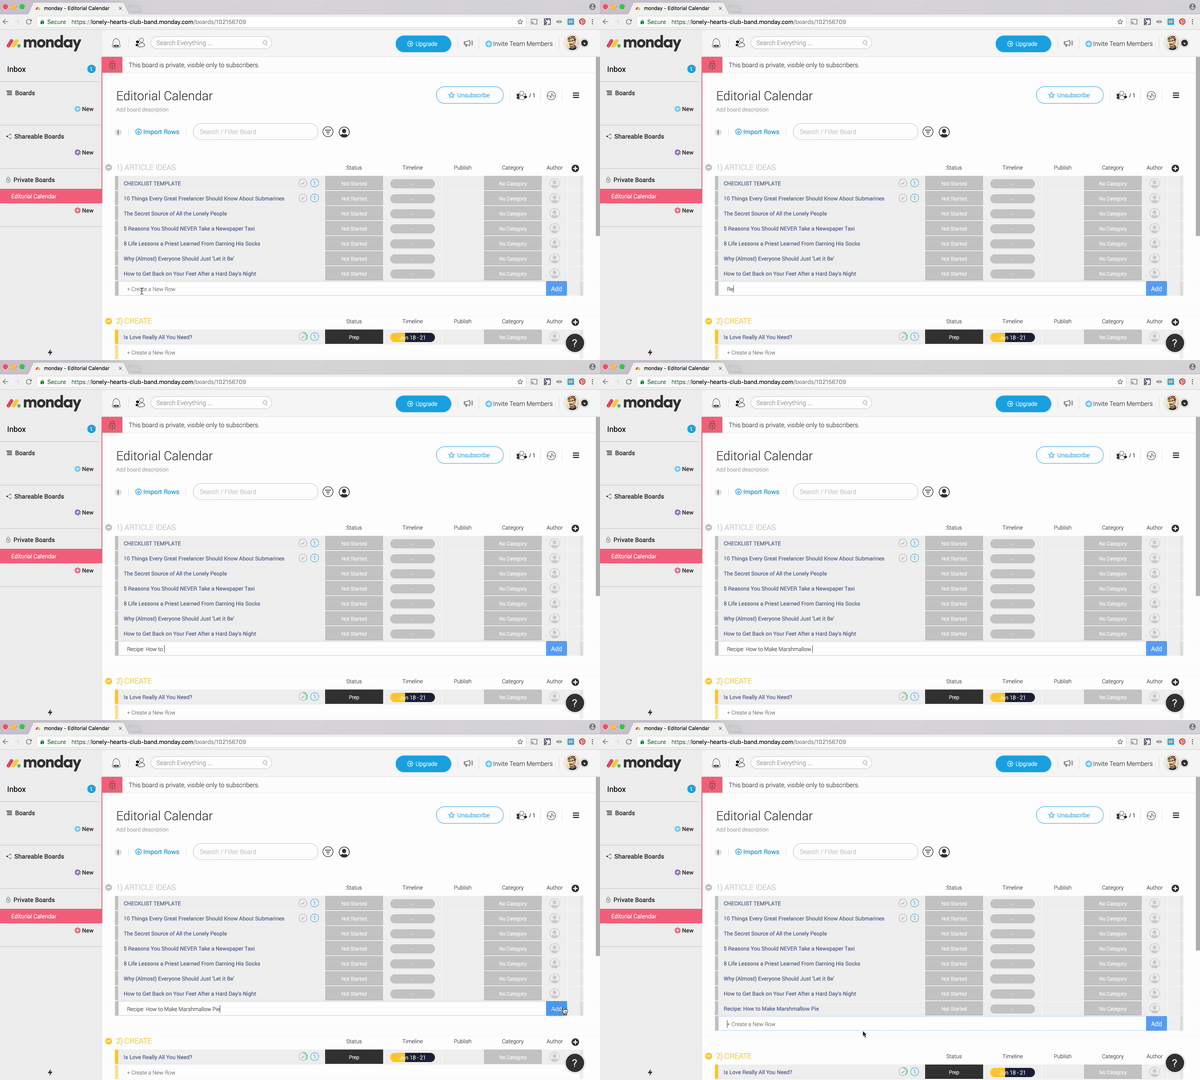
Over the week, any time you get a thought like, “I know what would make a good blog post!” add the idea here, by clicking Create a New Row.
The key though, is to add everything.
In other words, don’t worry too much about whether an idea will be a “good” post or not. You can figure that out later when you choose which ones to work on. For now, just add a new row, give it a working title, and move on with your day.
Soon, you’ll have a whole stack of potential blog posts waiting for you.
Say goodbye to starting each week trying to come up with a whole new topic. Instead, you’ll start each week by choosing one of your best ideas and moving it into your writing queue. Let’s do exactly that in our next step…
Step 2: The Checklist
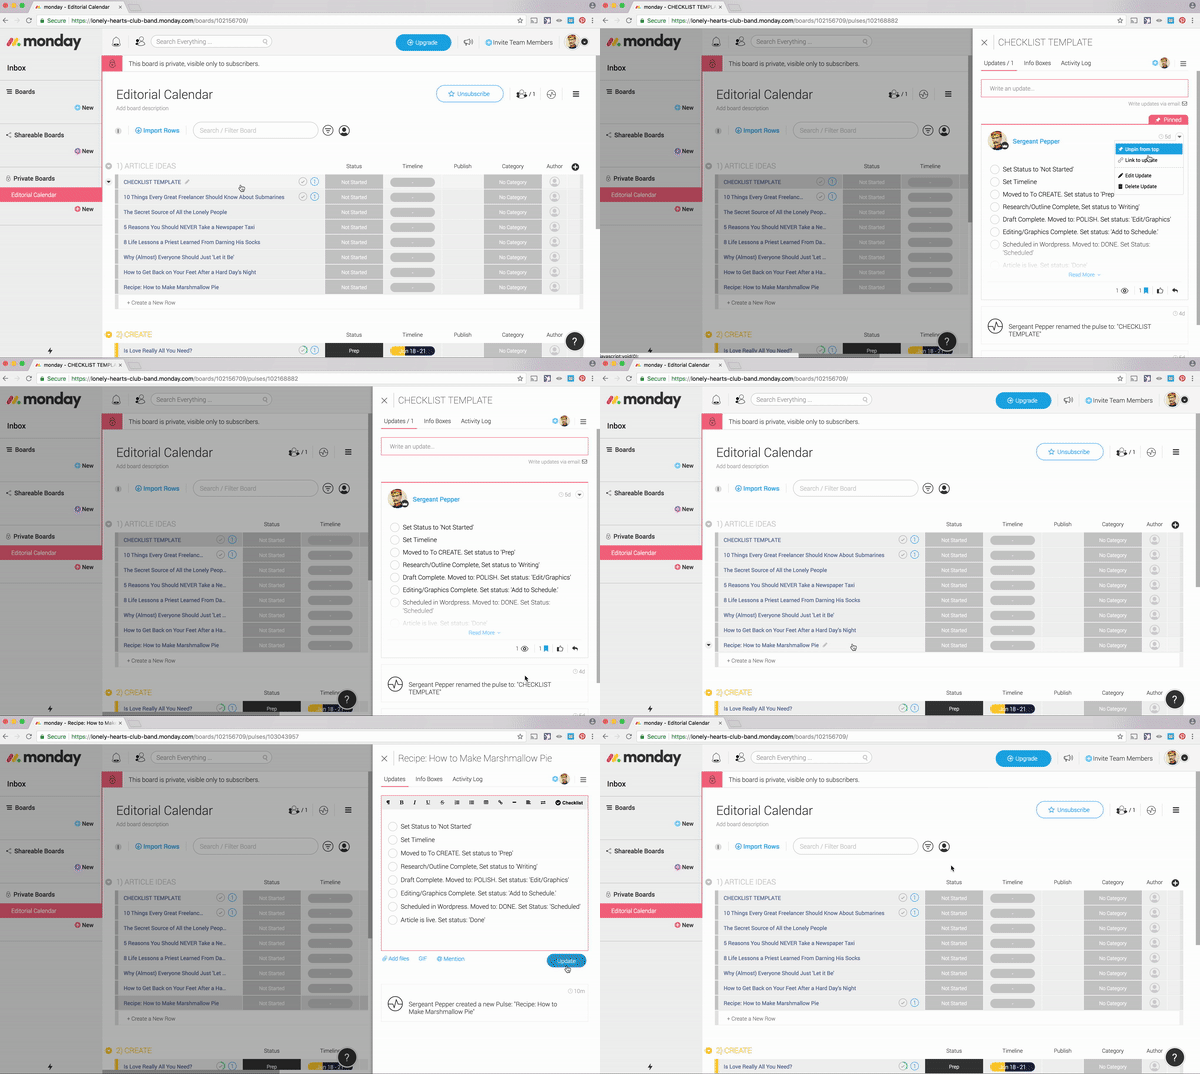
It’s the beginning of the week. You’ve chosen a particularly spicy post idea that you’d like to work on over the next few days. To move it into your queue, first open it up and paste in the checklist you’ll be using to keep track of your work (in our example, we’ve saved a copy of it in a CHECKLIST TEMPLATE item at the top of the ARTICLE IDEAS section).
This checklist is built to help you stick to your writing schedule without dropping the ball. Follow it, and you’ll soon be publishing posts like nobody’s business. To get started, add copy over all eight list items below:
- Set Status to 'Not Started'
- Set Timeline
- Moved to To CREATE. Set status to 'Prep'
- Research/Outline Complete, Set status to 'Writing'
- Draft Complete. Moved to: POLISH. Set status: 'Edit/Graphics'
- Editing/Graphics Complete. Set status: 'Add to Schedule.'
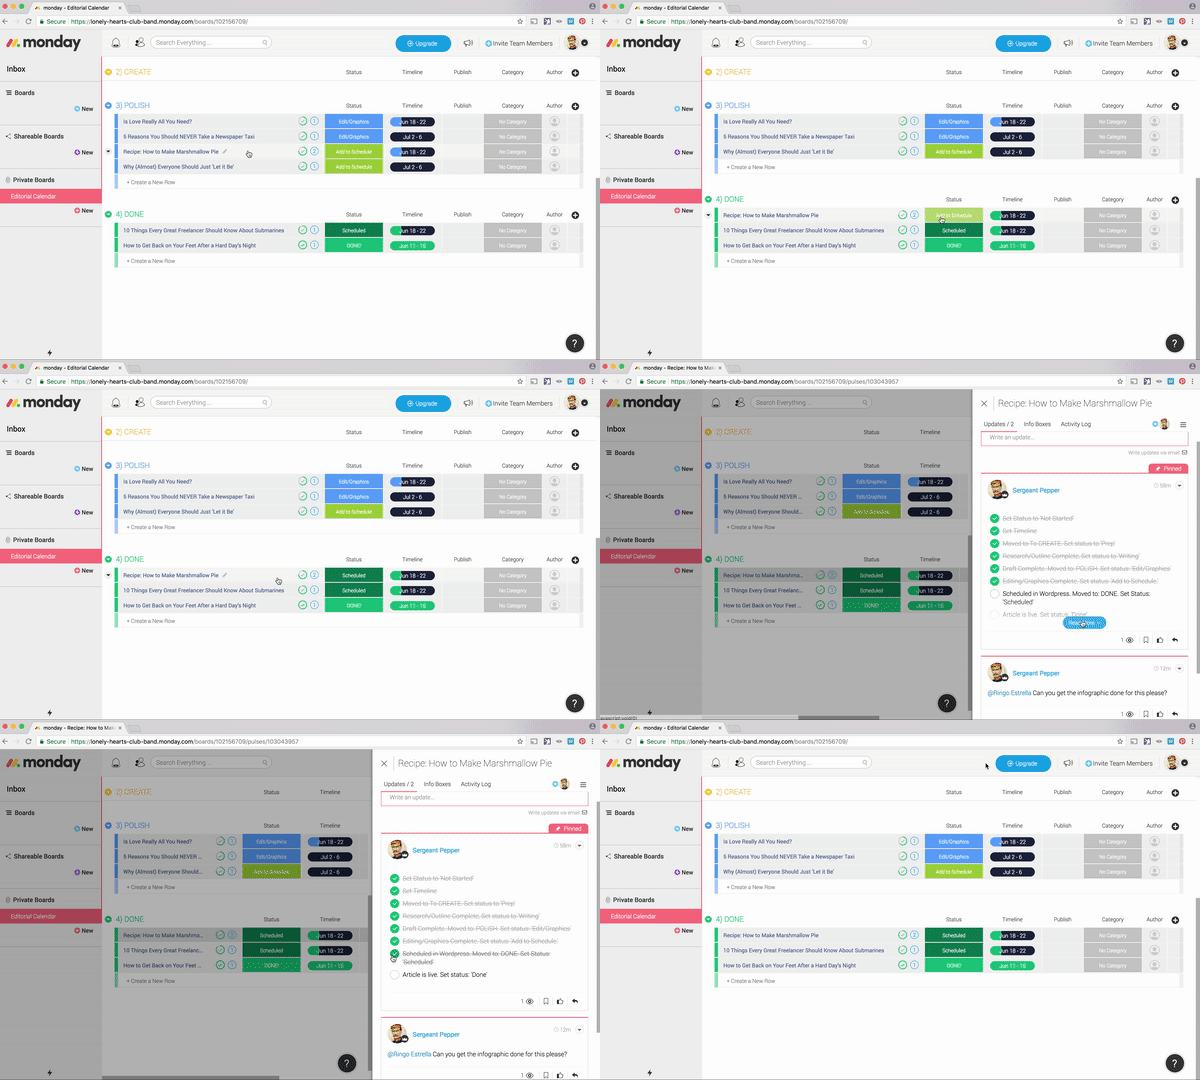
- Scheduled in Wordpress. Moved to: DONE. Set Status: 'Scheduled'
- Article is live. Set status: 'Done'
Each item in the list represents the very next step you need to take in order to create a new post. As you check items off, the system will show you a cute little progress bar so you can quickly see how much work you have left to do on a post before it’s ready to be published.
The first two items in the list you just copied over are easy. In fact, you’ve already completed the first item without even realizing it!
You see, every potential blog post idea you add to your editorial calendar is automatically assigned a Status of ‘Not Started’ when you create it. You can see the current status of all your blog posts in the aptly-named, Status column.
This helps you quickly glance at your board and see how each of your posts are progressing. As you work on a post, you’ll update the status to reflect what stage in the process you’re currently at. These are super fun— it feels great to update the status on your work and to visually “see” them moving along.
However, since your post is already marked as “Not Started” you can check the first item, “Set Status to Not Started” off of your checklist. Nice job, you. Ready for the next step?
Step 3: Set a Timeline
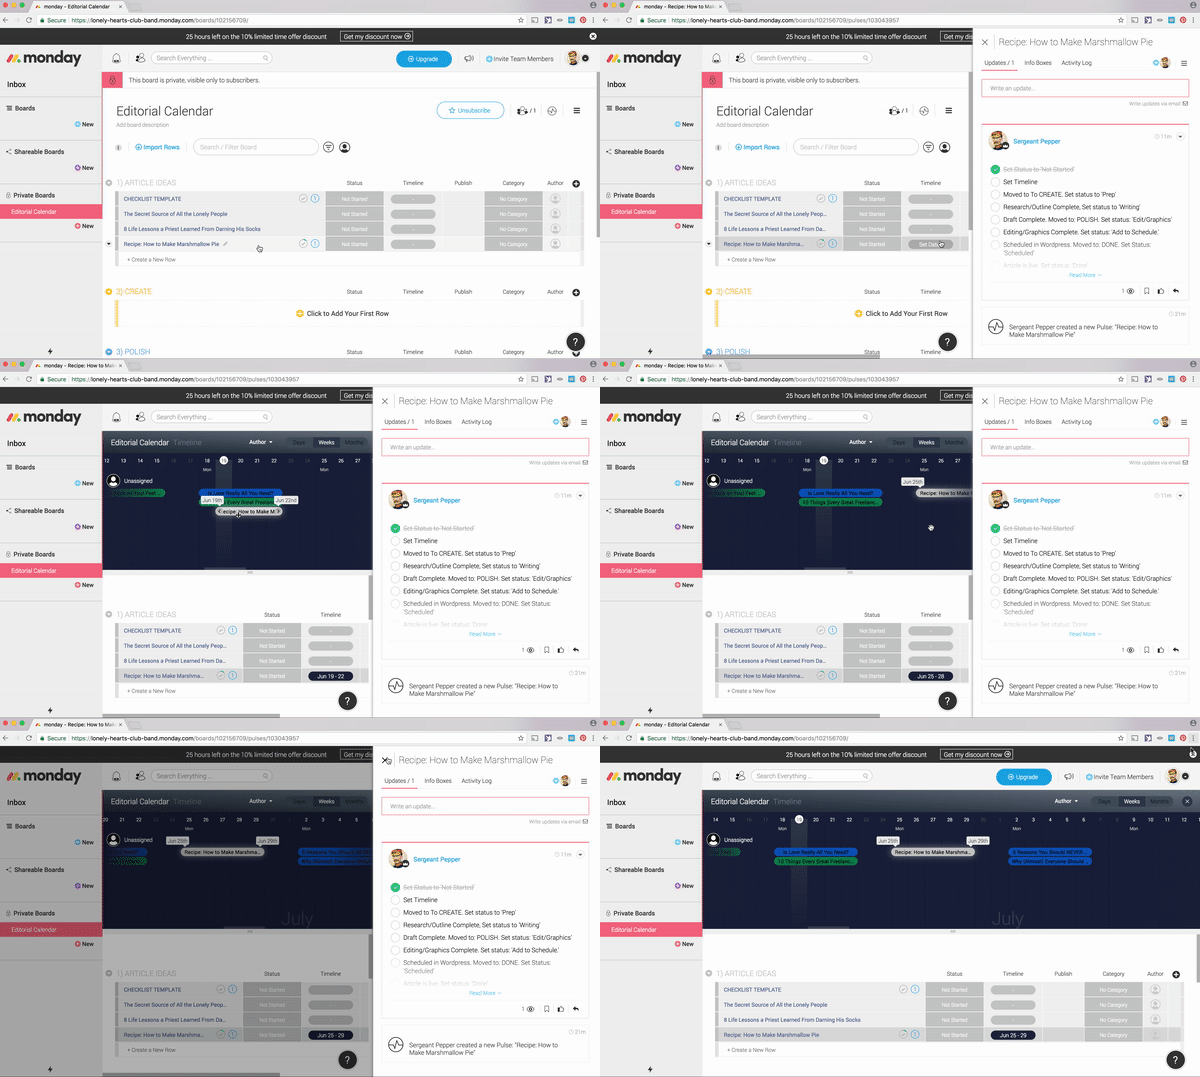
Next up, we need to add a ‘timeline’ to your article. Your timeline is simply all the time between today and whenever you want to add the finished post into your Wordpress scheduler.
Calculate the timeline like this: how much time are you going to give yourself to research the topic, create an outline, draft the entire thing, find relevant images, proofread everything, and schedule it to be uploaded on the blog?
Basically, how long will it take to get your new article 100%-ready to be published?
If you want to publish once a week, then let’s say five business days. In other words, we want to start working at the beginning of the week and have the post ready to go by Friday. Create a timeline and drag it into place.
Timelines are awesome because they’ll all show up together in a calendar at the top of your board. They’ll also change color in real time to reflect whatever stage of the writing process you’re currently at, so you can quickly see what you’re supposed to be doing on any given day. Throughout the process, you’ll notice each timeline filling up as the deadline gets closer.
After you’ve added a timeline, check off the second checklist item. You’re already making progress! But, you’re probably eager to start typing, so let’s get started on creating the actual post in our next step.
Create
Step 4: Do Your Prep Work
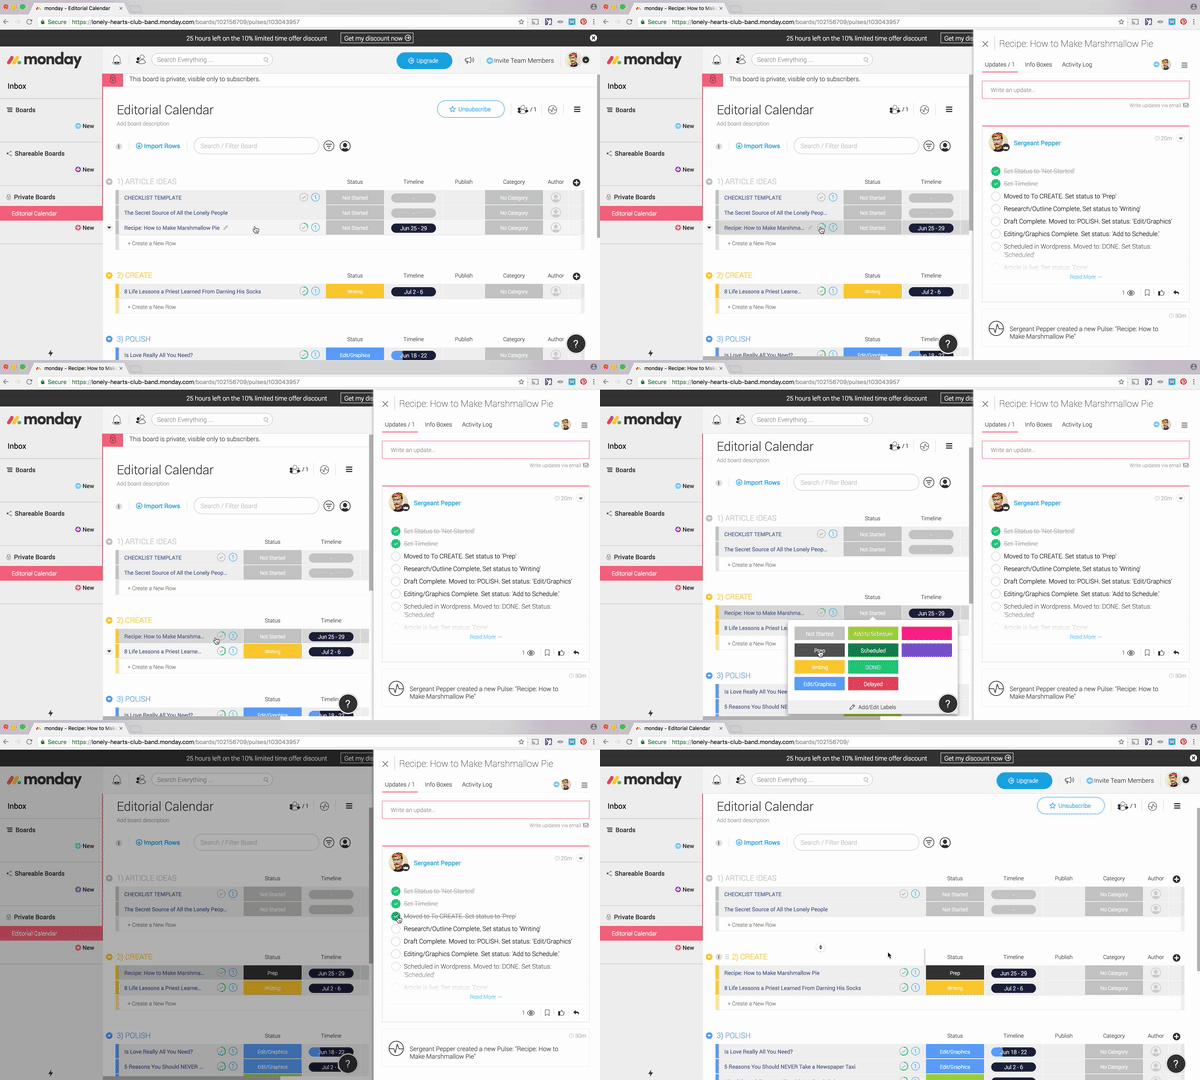
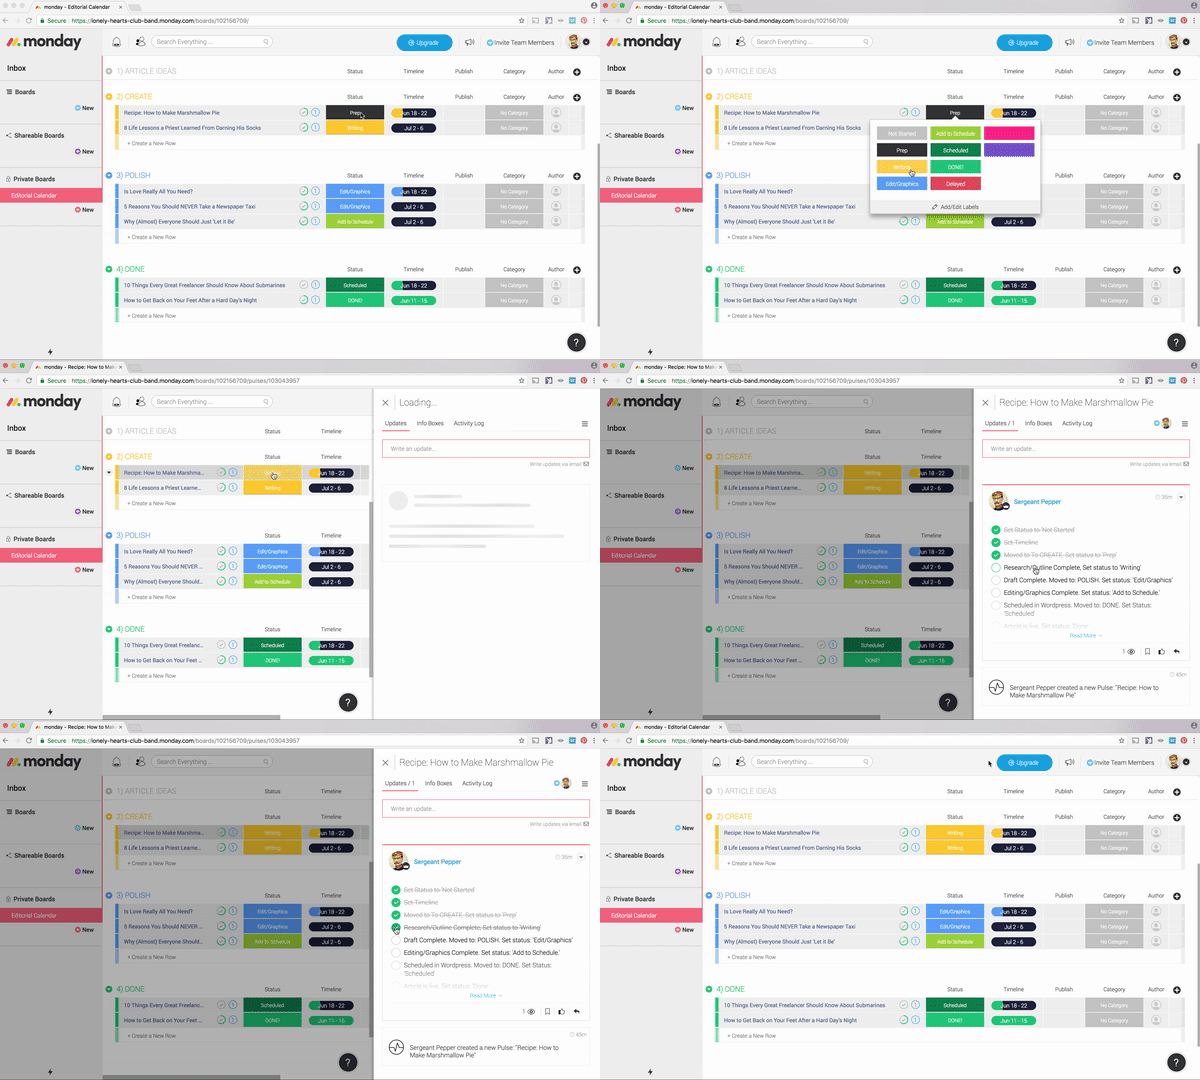
Ok, we’re ready to start. Let’s move our article to the CREATE section, set the current status to Prep, and check off our third checklist item.
At this point, you’ll notice that the color of your timeline has changed from grey to yellow.
This is because you’re now working on the article from within the CREATE section. All items in the CREATE section will get this yellow label. When you finish writing and move it to the POLISH or DONE sections, you’ll see the timeline change color to blue or green, respectively.
You’ve also successfully moved this post into the Prep stage. That means it’s time to get everything together before you can start on your first draft. Depending on your process and the kind of content you create, you might need to:
- Do some research;
- Put together an outline;
- Figure out any SEO Keywords you want to target; etc.
Whatever you need to do, make it happen. You want to be completely ready to start on a rough draft with no distractions before you move on to the next step.
All done? Got an outline together? Fantastic. Let’s start writing.
Step 5: Start writing!
Ready to put pen to paper? If so, change your article’s status from Prep to Writing, and check off the fourth item in your checklist.
Now all you have to do is put together a rough draft. At this stage keep in mind: done is better than perfect.
There will be time to edit later. For now, you simply want to get something written instead of procrastinating. So make your coffee, sit down, and start typing. You should already have a fairly detailed outline from the previous step; all you need to do now is flesh it out and get the first draft out of your head.
When your draft is complete, let’s get it polished and ready for your audience to fall in love with.
Polish
Step 6: Adding Bells and Whistles
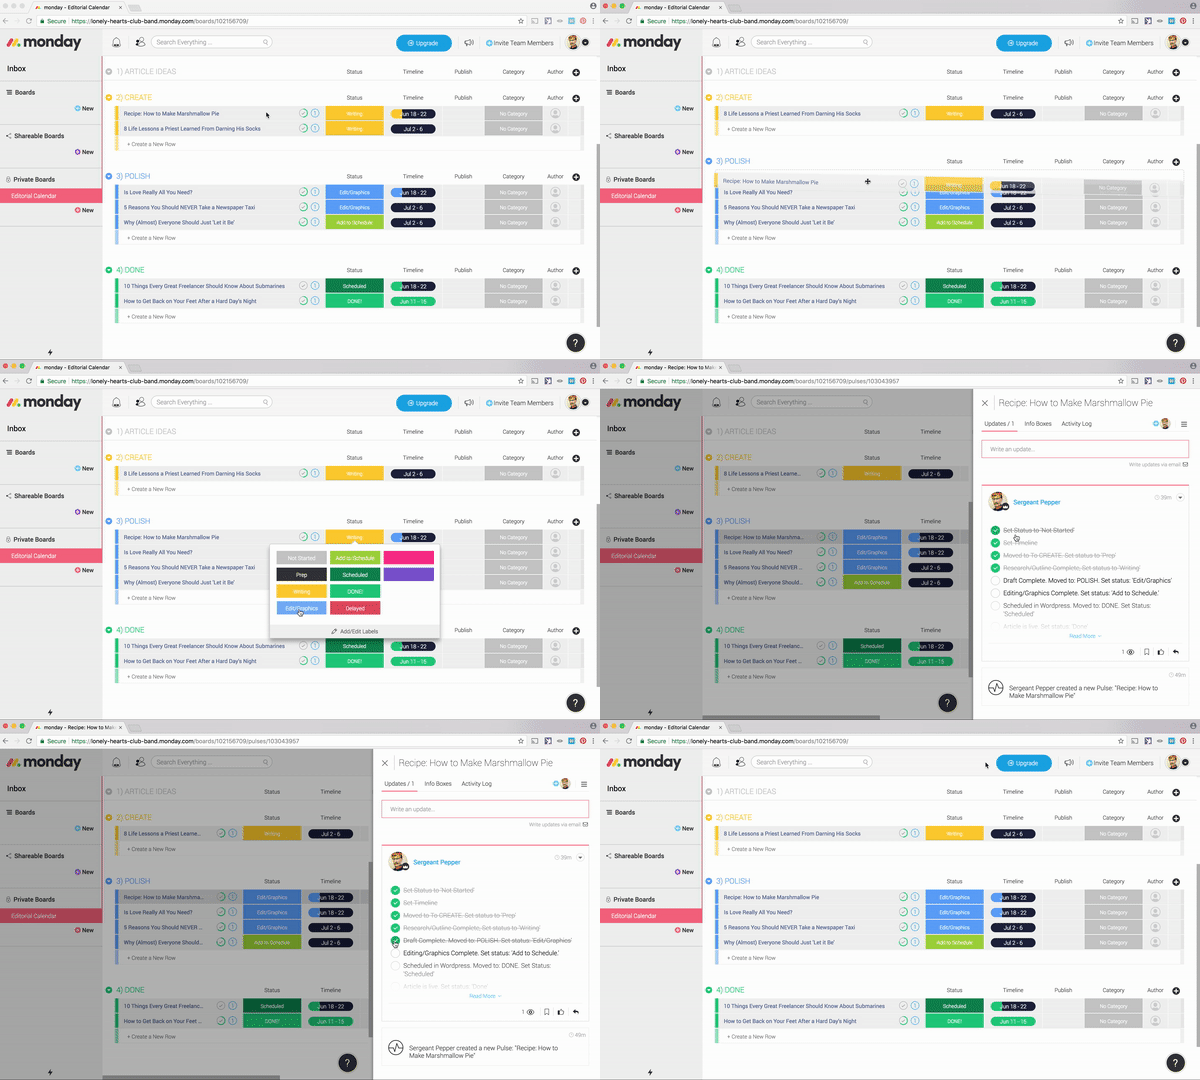
Great job finishing the first draft. For a lot of bloggers, that’s the hardest part of this entire process. Now that you’ve got something to play with, drag your article into the POLISH section, set its status to Edit/Graphics, and check of your fifth checklist item.
At this point, you’ll want to go ahead and get your article as close to perfect as possible. Again, depending on your process and the kind of content you publish, you may need to:
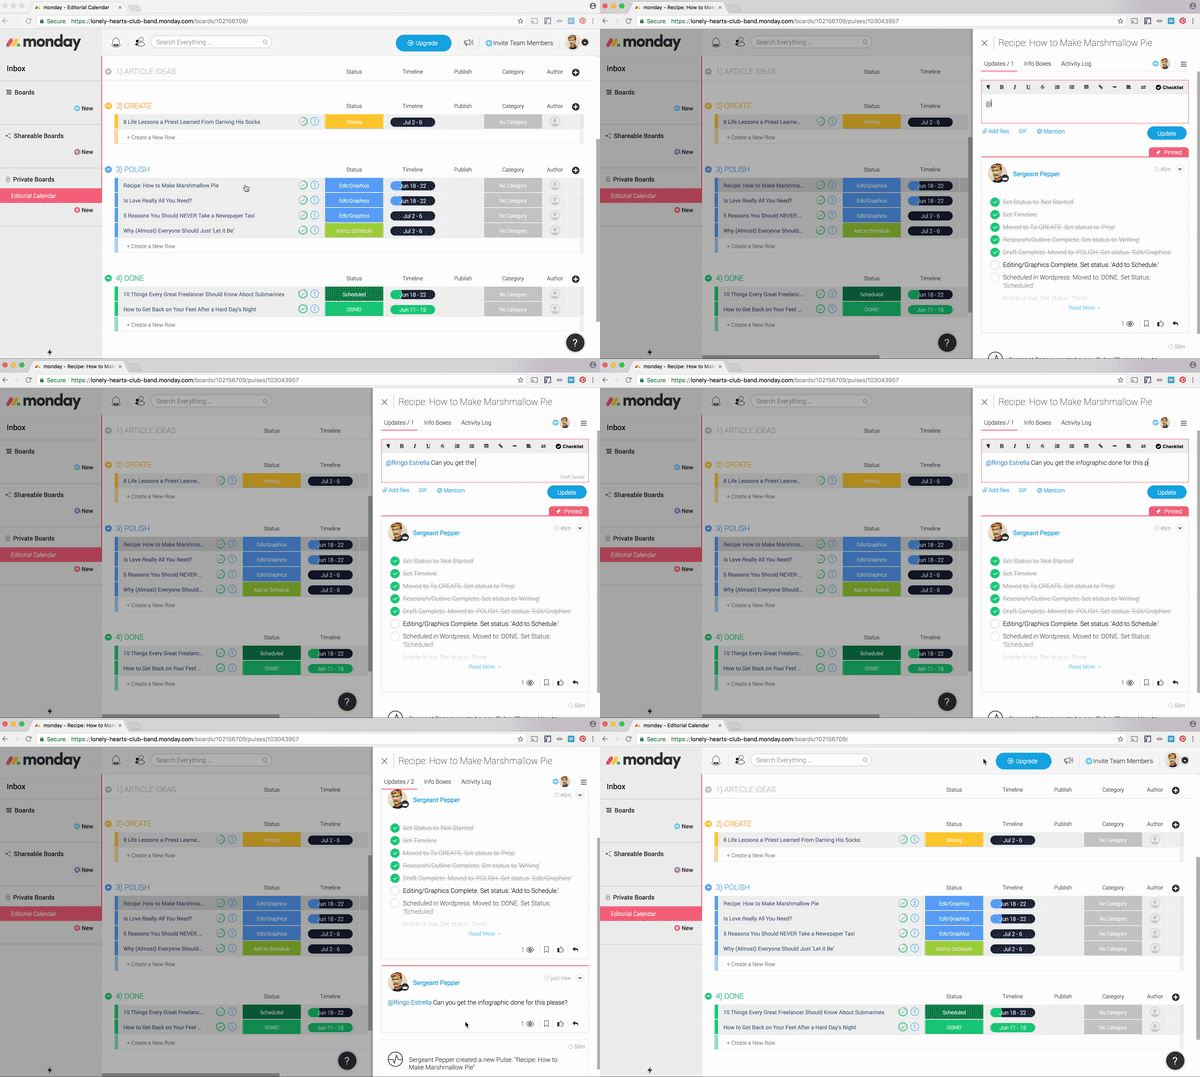
If you work in a team, you can also share your work-in-progress with whoever needs to see it by tagging them from within Monday.
For example, you could tag your design team if the article needs an infographic. Or, tag your social team so they can get to work preparing and scheduling tweets to promote your article.
This is another reason Monday.com works so perfectly as an editorial calendar.
You may be a solo outfit right now, but if you ever begin hiring a little outside help, you can use Monday to keep everyone on the same page. It’s just a great tool all around.
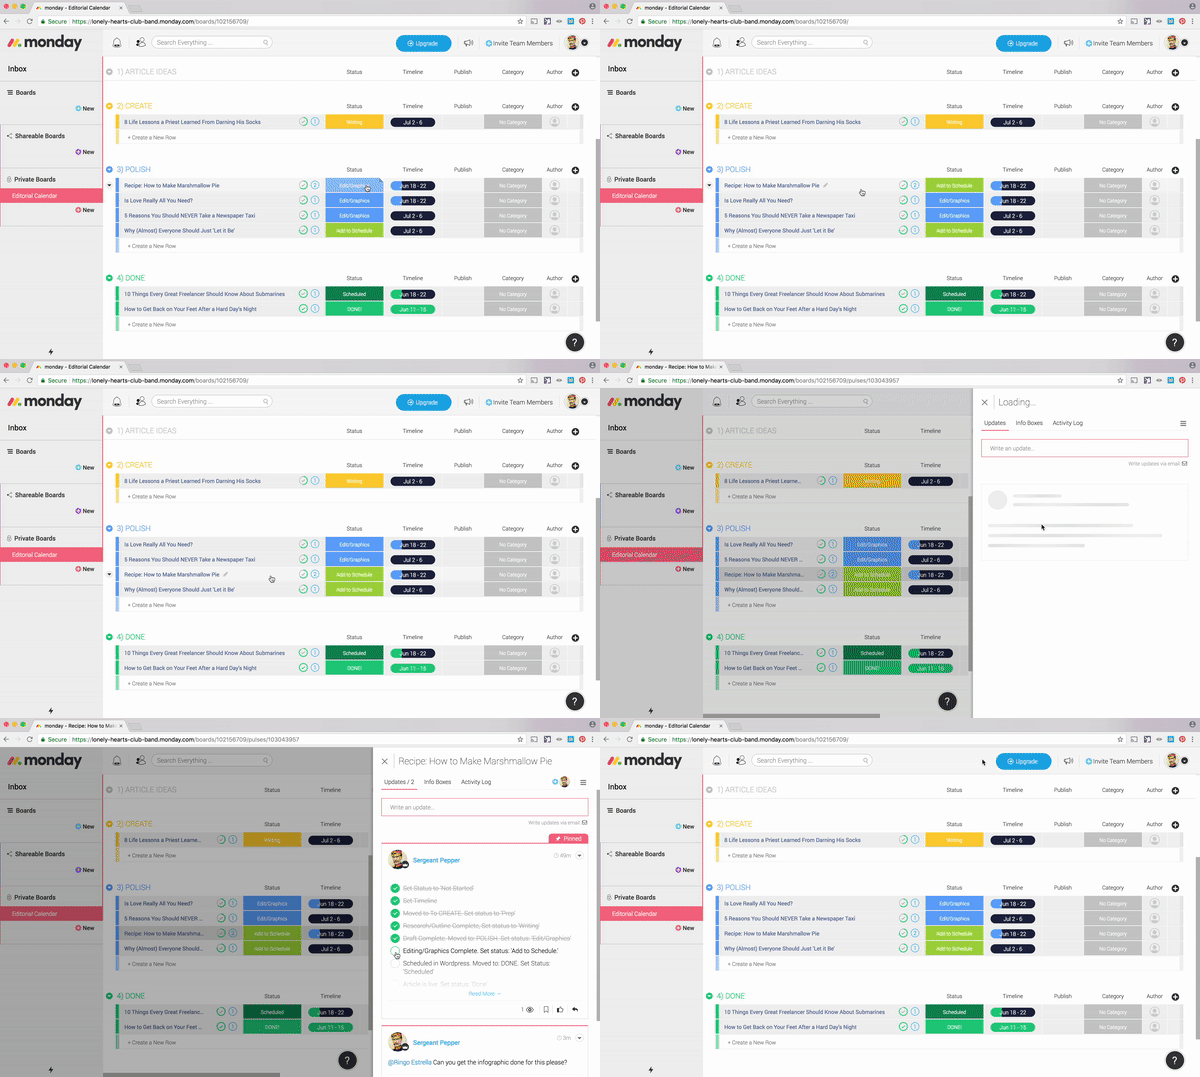
Anyway. After your team has weighed in and your post is 100% ready, all that’s left is to schedule it for publishing. Set the status to Add to Schedule, check off the sixth item in your list, and schedule it using whatever Wordpress scheduler you’re used to.
Looks great. Let’s get this thing published…
Done
Step 7: Feels good, don’t it?
With your post complete and scheduled in Wordpress, all you have left to do is move it to the DONE section, change the status to Scheduled, mark your seventh checklist item complete, and crack open a cold one. You’re done!
Well, almost done… there’s still one checklist item remaining.
The last item, “Article is live. Set status: ‘Done’” is for exactly that— once your scheduled article is published on your blog, log in to Monday and set the status to Done.
This is hands-down, the most rewarding part of the entire process. It feels amazing checking off that last item and lighting up your board with a bunch of green labels. After a while, you’ll find yourself eagerly racing through blog posts in order to fill this section with satisfying green reminders of your awesomeness.
Habit building
One of the hardest parts of operating a blog is remaining consistent with your posting schedule. Eventually, life will get in the way.
Use tools like Monday to keep yourself accountable and make it easy to see how much work you’ve got ahead of you on any given day. Pretty soon, you’ll get in the habit of waking up, opening Monday, and tackling your day’s tasks without hesitation.
At that point, call yourself a professional. You’ve earned it.
Get started now
Ready to build your own calendar? You’ll need an active Monday.com account before you can jump in. Get one (for free!) by clicking this link.


